The clash known as the Battle of Tiems represents a significant engagement during the Galactic Civil War, pitting the forces of the Alliance to Restore the Republic against those of the Galactic Empire. This conflict unfolded around 0 ABY in the vicinity of the city called Tiems, which is located on the planet sharing the same name within the Outer Rim Territories. Under the command of General Carlist Rieekan, a contingent comprising three Alliance Army infantry regiments undertook a mission to liberate numerous Alliance prisoners from Imperial facilities situated in Tiems. Despite achieving their primary objective, their planned extraction faced complications due to enemy starfighter activity delaying the arrival of their transports.
Faced with defending a specific location—the designated landing zone for their evacuation—against an enemy with greater numbers, Rieekan adopted a mobile defense strategy. Anticipating that his Imperial counterpart would concentrate the full force of his attack on the weakest point in the Alliance's defensive setup, Rieekan skillfully lured the Imperial forces into a carefully orchestrated trap, resulting in the destruction of approximately half of their combatants. The surviving Imperial soldiers retreated to Tiems to reorganize and receive reinforcements; however, by the time the Imperial commander had his forces ready, the Alliance soldiers had already been successfully evacuated from the planet. In the aftermath of the battle, this engagement was used by Alliance Special Forces General Crix Madine during orientation briefings for new Rebel ground force commanders as an ideal illustration of the mobile defense tactic.
Circa 0 ABY, the Alliance, having discovered that the Galactic Empire was detaining several thousand members of the Alliance to Restore the Republic in prisons on the planet Tiems within the system of the same name located in the Outer Rim Territories' Belderone sector, launched a rescue operation. Under the command of General Carlist Rieekan, a detachment consisting of three infantry regiments was tasked with this mission, supported by several transports intended to carry the troops to the planet and subsequently extract them along with the freed prisoners. The Imperial garrison on Tiems comprised four regiments of Imperial soldiers, four regiments of local troops, and access to starfighter support.
The Alliance Army regiments commanded by Rieekan landed and proceeded to assault the city of Tiems, where the prisons were located. They successfully destroyed a power station and liberated all of the imprisoned Rebel personnel. After the mission, Rieekan and his troops were scheduled to move down the Tiems Road toward a landing zone situated beyond a small town for extraction. However, the transports intended to extract Rieekan, his troops, and the prisoners were delayed due to enemy starfighter activity. Forced to defend the designated landing zone against an anticipated Imperial counter-attack—which was expected to be numerically superior—until the rescue could be carried out, Rieekan opted to employ a mobile defense and draw the Imperials into a trap.
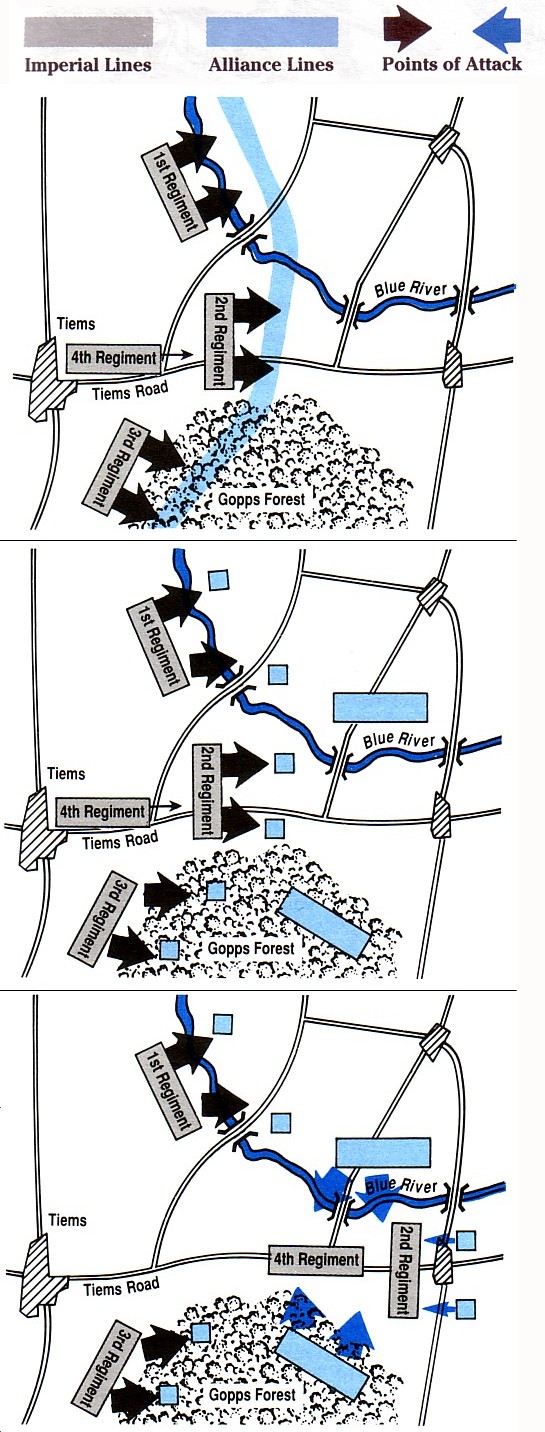
The Tiems Road, which ran between the city of Tiems and the designated landing zone, was bordered by the Blue River on its right and the Gopps Forest on its left. A small town was situated at a crossroads along the Tiems Road, positioned between Tiems itself and the Alliance landing zone. Rieekan strategically deployed his troops in a defensive line across the open terrain surrounding the Tiems Road, utilizing the forest and river for cover on the flanks. His plan was to create the illusion that all three regiments of soldiers under his command were holding the line, while in reality, it was only manned by the equivalent of one regiment. Rieekan, understanding that Imperial doctrine emphasized concentrating maximum force on the weakest point of the enemy's line, anticipated that his Imperial counterpart would focus his assault on the center of the Alliance line, which lacked forest or river cover. The remaining two regiments were positioned behind the line, concealed by the forest and the river on either side of the road near the town at the crossroads.
At 1330 hours local time, the Imperial General ordered his troops to attack the Alliance line. Under his command were four infantry regiments. The 1st and 3rd Regiments attacked the flanks of the Alliance line, pinning the battalions manning the line in place. As dictated by doctrine, the 2nd Regiment targeted the center of the line—the weakest point due to the absence of forest or river cover. The 4th Regiment was held in reserve, ready to exploit any breakthroughs. The fighting was intense along the entire line, with the Alliance battalions assigned to the defense holding their ground against a superior force for over two hours to allow the trap to be sprung. The troops on the flanks were ordered to hold firm, while the troops in the center were instructed to retreat at the appropriate time and fall back to the town at the crossroads.
Following Rieekan's command, the troops in the center executed an orderly withdrawal toward the town situated between their position and the landing zone, where they established defensive positions. The 2nd and 4th Imperial regiments pursued the Alliance forces, moving directly between the two hidden regiments positioned along the bank of the Blue River and within the Gopps Forest. The hidden Alliance forces launched a flank attack on the Imperial regiments, while the battalions that had retreated to the town counter-attacked from the front. The Alliance forces encircled and nearly destroyed both Imperial formations.
After the ambush, the surviving Imperial forces retreated in disarray back to Tiems to await reinforcements. A full division of native soldiers—comprising four regiments—arrived at the city twenty-four hours later. The Imperial commander waited an additional twelve hours before launching another offensive, allowing for the weather to improve sufficiently for air support from a local base. By this time, General Rieekan's detachment and the prisoners had been successfully extracted from the planet, their mission successfully completed.
General Rieekan's After Action Report underscored that the victory was only possible due to the highly trained, motivated, and well-led Alliance troops, who withstood the superior Imperial forces for hours while the trap was being prepared. Furthermore, Rieekan's deep understanding of Imperial doctrine, and his certainty that his Imperial counterpart would adhere to those combat principles, enabled him to devise a trap into which the Imperial commander would inevitably fall.
Rieekan also demonstrated at Tiems that eliminating the enemy was not always necessary for victory. The Imperial forces began the battle with four regiments compared to the Alliance's three. The Imperials lost two regiments in the ambush, while the Alliance lost the equivalent of one regiment in setting up the trap. When the Imperial commander received reinforcements, he had six regiments under his command, while the Alliance had two. The Imperials held a three-to-one advantage but delayed their attack to wait for air cover—which arrived too late.
Following the battle, General Crix Madine, the commander of the Alliance Special Forces, used the battle as a prime example of mobile defense in briefings for new Alliance ground commanders. He analyzed the battle plan in detail, urging the new commanders to study the Battle of Tiems to apply its lessons in their own operational areas. Among the lessons he hoped the new commanders would learn was that defeating an enemy did not require destroying them, and that instilling fear in the enemy commander through superior tactics and strategy would provide them with an advantage.
The Battle of Tiems was initially presented in Chapter 6 of The Rebel Alliance Sourcebook, released in 1990. It was subsequently reprinted in The Rebel Alliance Sourcebook, Second Edition in 1994. In the sourcebook, Tiems is mentioned solely as a city where the battle occurred, without referencing the planet on which the city is located. In 2009, The Essential Atlas included a reference to a "Tiems system" in the appendix, implying the existence of a planet named Tiems. Jason Fry, the author of The Essential Atlas, confirmed that this was intentional during the compilation of the Atlas, explaining that he felt the original sourcebook missed an opportunity to name the planet, while the name "Battle of Tiems" suggested a larger conflict was taking place.
- The Rebel Alliance Sourcebook (Initial Mention)
- The Rebel Alliance Sourcebook, Second Edition
- The Official Star Wars Fact File 121 (RIE 1-2: General Rieekan)
- The Complete Star Wars Encyclopedia
- Rieekan, General Carlist in the Databank (content now obsolete; backup link)
- The Official Star Wars Fact File Part 10 (RIE 1-2: General Rieekan)